Please note: It is always advised to back up your site before making changes such as these.
1. Enabling Multi-site in your installation of WordPress
To enable Multisite in WordPress 3, add the following code into the wp-config.php file in the root of your site (anywhere near the top is fine). This simply tells the WordPress installation that you wish to allow the option of creating a network of sites on the one domain.
define('WP_ALLOW_MULTISITE', true);
2. Network Settings
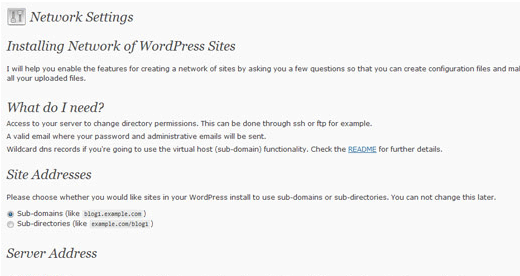
Now go to your WordPress admin and navigate to Tools -> Network (this link should have appeared upon adding the above to your config).
You should be welcomed with a screen that looks like the image below.
3. Sub-domains or sub-directories?
Here you need to choose between using sub-domains or sub-directories when adding a new site to the domain. You can only choose one for all and it can be quite tricky to alter this once you have selected one and set it up, so choose wisely!
The obvious difference is that sub-domains displays them as blog.domain.com whereas sub-directories displays them as domain.com/blog.
Choosing sub-directories is the easier to do and requires no altering of your DNS, so is the best option for most people.
But personally I prefer sub-domains as I think it reads better. When doing this it’s best to add Wildcard DNS to your domain. This is so that when you add a new blog to your multi-site WordPress installation, you don’t have to add a record for that blog to your DNS each time.
4. Enabling the Network
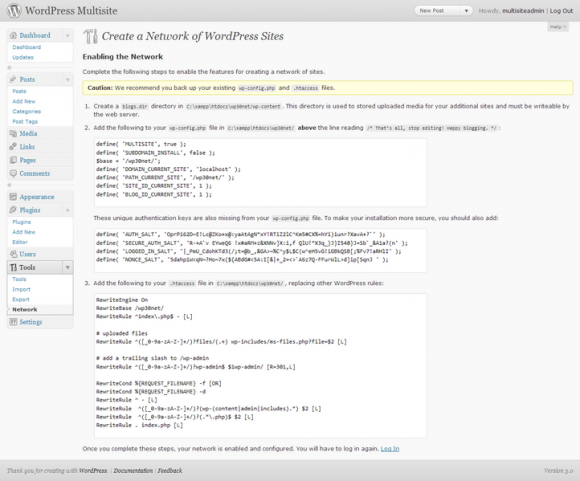
Next you will be asked to choose a name for your network and the adin email address for it. Fill those in and hit ‘Install’.5. After the installation completes, you will be shown a page with details you need to copy and paste into your .htaccess file and the wp-config.php file. The page should look like this.
5. I’ve been logged out? 🙁
You should find at this point that when you next click anywhere, you have been logged out. So, log in again…
6. C’est tout!
Basically, that’s it! Now you have done everything required to start adding multiple sites to your one installation 🙂 Below are a few more instructions on what things do and how to add sites and enable themes and plugins on your network.
Super Admin
You will find that there is now a menu on the left named ‘Super Admin’. From here you can add new sites to your network, manage the sites within the network, manage the users throughout every site on the network, enable themes to be used throughout the network, manage various options and also update.
Adding a new site
To add a new site, simply navigate to Super Admin -> Sites and scroll down to add the URL of the new site. Obviously you can only add the sub-domain/sub-directory name here and the admin email address for that site.
Once added, it will appear in the list above on that page. To edit the details of the domain, hover over the domain and click ‘Edit’, to visit the site, click ‘Visit’ and to get into the admin for that specific site, click ‘Backend’.
Enabling themes on the network
Every time you add a new theme as the administrator, it will be disabled by default for users of the sites your have created to use. To let them use this, simply go to Super Admin -> Themes and enable it in there.
Enabling plugins on the network
To enable sites to use plugins, you need to go to Super Admin -> Options and scroll down to the very bottom until you see the checkbox title ‘Plugins’. Check this and update the page.
It’s worth taking a minute to look at all the options on this page. They give you control of various aspects of the sites in the network, such as allowing them to upload images, media, the upload limit and site space limit.
When you add a new plugin, you have the choice to activate it on the network or just on the site you added it to. Obviously Network Activating it means that it is activated throughout every site on the network. It’s great it that’s what you need, as you don’t have to add it and activate it manually for each one.


